
Created on 2008-02-02 22:57:00
Getting Started with API Programming for APx
While APx500 Measurement Software has the most advanced audio measurement user interface in the world, sometimes the operator needs a simplified interface (for example quality testing on the production line), or application-to-application automation is required. For these cases, APx has an comprehensive API (Application Programming Interface).
The basic idea here is to do as much as possible in the APx UI, save an APx project file, then use a VB.NET application and the API to open and run the APx project file, if necessary sending additional commands to the analyzer such as repeating measurements, skipping measurements (branching), or changing measurement settings.
Creating the APx Project File
Your first step is to create your test sequence inside the APx UI.
- Open APx and create a New Project (File > New Project).
- A default project has one signal path. To add more, go to Project > Add Signal Path, then use the Signal Path Setup view to define all the signal paths you’ll need for your DUT (Device Under Test.) In our example I have three: unbalanced analog, balanced analog and digital.
- Best Practice: Give each signal path a unique name so it can be identified easily through the API.

Fig 1: The APX UI.
The second step is to add the necessary measurements to each signal path and configure them. Measurements cannot be added to a signal path through the API, so this work must be done in the UI. In my example, I have three measurements in each path: THD+N, Frequency Response and Crosstalk.
- A default signal path has the big 6 audio measurements. To add a measurement, right click on the Signal Path name and select the desired measurement from the dropdown menu. Note: It’s perfectly reasonable to have more than one instance of the same measurement, for example if you want to test THD+N at different frequencies.
- Best Practice: Configure each measurement while you’re in the UI as it’s easier to set initial settings here than from the API. Unless directed otherwise, the API will always use each measurement’s settings as they were left when the project file was saved.
- Best Practice: Like Signal Path, any time you’re working with more than one instance of a measurement, you should assign unique names: If the project file contains three measurements named “Frequency Response” within a signal path, any API call would only recognize the first instance of the measurement and would ignore the rest.
- Best Practice: To simplify your workspace, delete any unused measurements from each signal path by right clicking on the measurement and selecting “Delete Measurement”. Keep in mind measurements can’t be added through the API, so only delete measurements you’re sure you will not need to access.
- Best Practice: To minimize CPU overhead, turn off the signal monitors and click a non-updating measurement (such as a sweep) to select it. Signal monitors and constantly-updating measurements like Level require significant CPU resources, turning them off will free up those resources for other applications on your PC.
Finally, we’ll save this APx project file as “My_APx_ Project.approj”
Running the Project with Visual Basic .NET
My objective is to create a simple application that opens the APx control software and has buttons to show or hide the APx GUI, open a specific APx Project file, and run the APx measurement sequence defined in the project.
AP provides a VB Express project template installer which gives you a starting point for a new APx VB project. The template creates a VB project with the APx class defined and a blank form. We’ll take this blank form and add the functionality we need by assigning API commands to buttons on the form.
- First, I’ll open Microsoft Visual Basic 2005 Express Edition and launch the AP API project template by clicking File>New Project> Installed Templates> APx500 Application.
- Once the template has loaded, double click “APxMainForm.vb” in the Solution Explorer tree control to launch the Design View. You should see a blank Windows form. Double click on the form to enter the code editor for the form.
- Use the VB interface to add three buttons to the form. You can do this in the code view or in the design view. Please refer to the screen shot below or the tutorial sample project for syntax.
- Button 1 toggles the APx software visibility using the APx API command APx.Visible
- Button 2 loads the APx project file using the APx command APx.OpenProject
- Button 3 runs the measurement sequence and generates the report using the command APx.Sequence.Run
- Best Practice: Add a try-catch statement for each event in the code. Adding a try-catch statement will stop the application you’re building from crashing if it encounters an error. The Try-catch consists of a try block followed by one or more catch clauses, which specify handlers for different exceptions (errors).
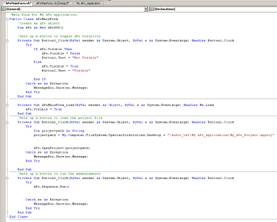
Fig 2. Code syntax.

Fig 3: The end result: a simple APx Interface
When you've finished coding, publish the project.
You now have a simple application with buttons to toggle APx visibility, open the My_APx_ Project file and run the sequence. For more functionality, simply build on this foundation with more API calls.
Related Downloads