
Created on 2012-11-28 19:06:00
All the APx500 measurements for frequency response allow you to apply equalization to sine waves produced by the generator. The APx EQ .wav Files Utility lets you apply equalization to generator source .wav files as well.
Generator equalization is commonly utilized when measuring microphones, in order to compensate for frequency response variations in the stimulus speaker. To do this, a high quality measurement microphone is used to measuring the frequency response, and then the results are inverted. This creates an equalization curve that can be applied to the generator to cancel out response variations. For greater precision, the (typically small) response variations of the measurement microphone can be factored in as well. When utilizing an artificial voice to test portable device mouthpieces, the equalization compensates not only for speaker performance, but for the acoustics of the artificial voice’s mouth and throat cavity.
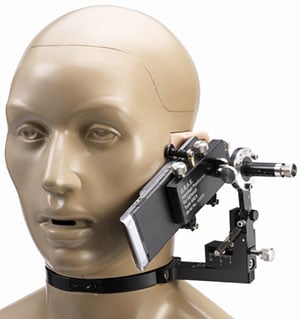
Fig 1 G.R.A.S. KEMAR manikin Type 45BM with 45EA handset positioning system.
The procedure explained above for creating and applying an inverse EQ curve is illustrated below:
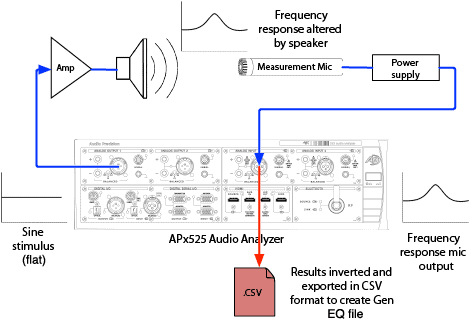
Fig 2 Using a flat sine stimulus to measure speaker deviations and create a compensating inverse EQ curve.
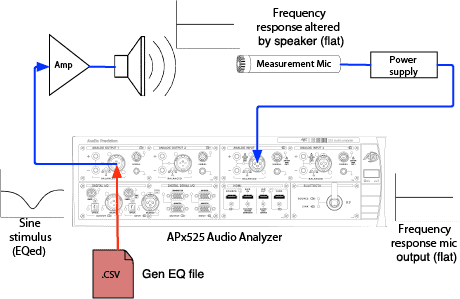
Fig 3 Applying the compensation EQ to the generator, resulting in flat output from speaker.
To measure the frequency response of a device, the DUT is substituted for the measurement microphone.
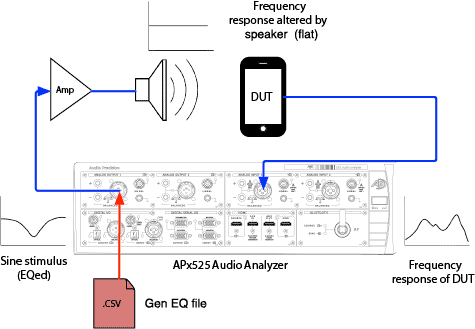
Fig 4 Measuring the frequency response of the DUT.
When the generator stimulus source is a .wav file instead of a sine wave, the APx EQ .wav Files Utility is used to apply the inverse EQ curve to the .wav file.
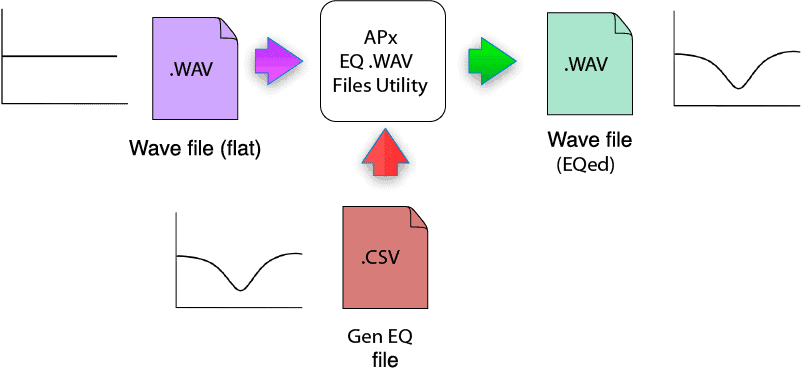
Fig 5 Using the APx EQ .wav Files Utility to apply EQ to a .wav file.
Then the equalized .wav file is used as the generator source.
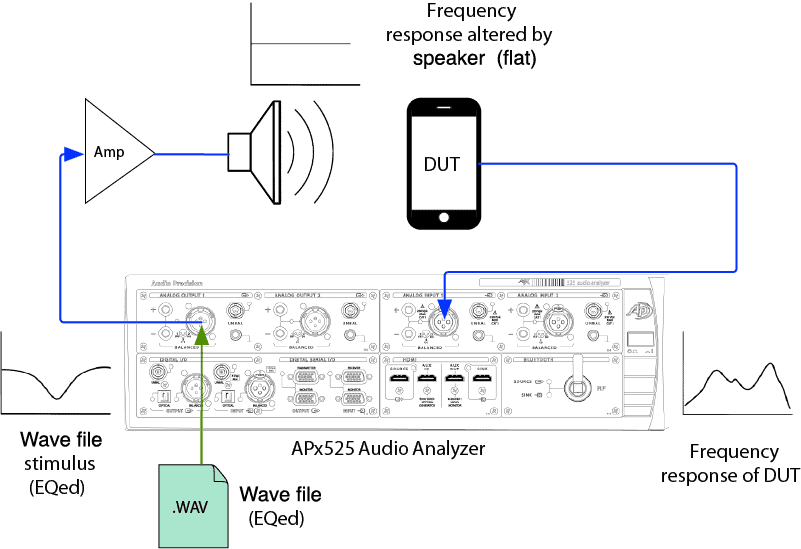
Fig 6 Loading the equalized .wav file into the APx generator.
The ability to equalize .wav files is perhaps most valuable for PESQ subjective audio measurements. In APx500, .wav files containing speech samples are used as the generator stimulus signal for the PESQ measurement. PESQ works by comparing the audio received by the analyzer to the original speech samples. By using equalized versions of the speech samples, we can remove response errors introduced by the stimulus speaker and assure that any measured degradation of audio quality due to frequency response errors is caused by the device under test (DUT).
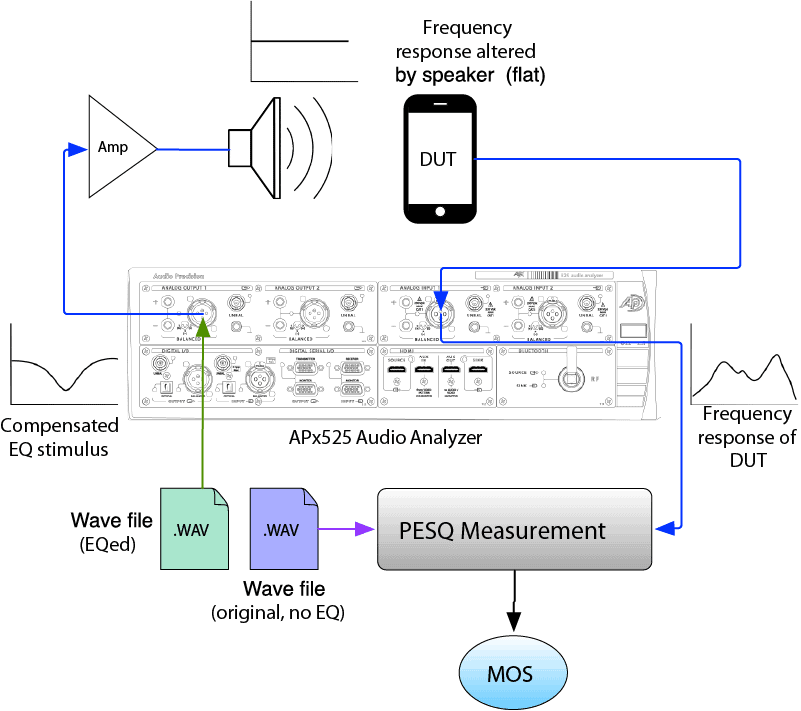
Fig 7 Loading the equalized .wav file into the APx generator, and using the flat .wav file as the reference.
It is important to note that the reference signal must be the original file and not the equalized file, because the reference is not degraded by the loudspeaker. APx500 gives you the choice to use separate files for the generator and the reference, or to use the same file for both (when not applying equalization).
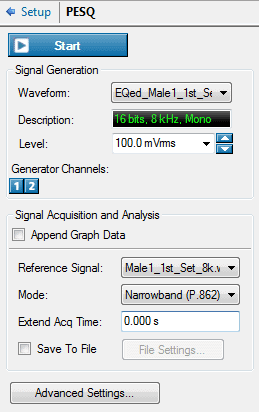
Fig 8 The APx PESQ measurement settings panel allows the generator waveform and the reference signal to be chosen independently.
The APx .wav Files Equalization Utility can also be used to apply equalization to audio at the analyzer inputs before calculating measurement results (post EQ). This can be useful when utilizing an artificial ear or HATS (head and torso simulator). In some cases, it is necessary to convert the frequency response at the DRP (eardrum reference point), where the measurement microphone is located, to the response that would theoretically be measured in the free field. In this scenario, use the APx500 Measurement Recorder to first capture the acquisition to a .wav file. Then use the utility to create an equalized version, and load the equalized file into APx500 for analysis (Input Connector: File (Analog Units) or File (Digital Units)).
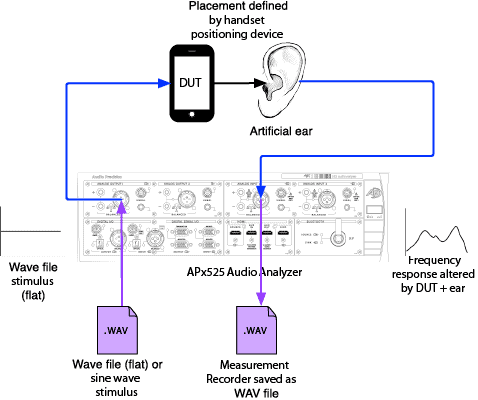
Fig 9 A sine wave or .wav file is used as the generator stimulus, and a new .wav file is recorded with Measurement Recorder.
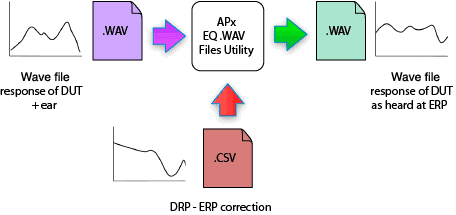
Fig 10 The new .wav file is EQed with the utility.
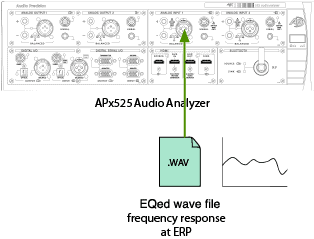
Fig 11 File analysis mode (input source File) is used to perform measurements on the equalized acquisition.
The utility includes both a GUI version and a command-line version. The GUI version has a simple interface for selecting the input file, the .csv file with the EQ curve, and an output file. Some sample .csv files are included with the utility as examples to show the proper format. The data export feature in APx will also create a properly formatted .csv files.
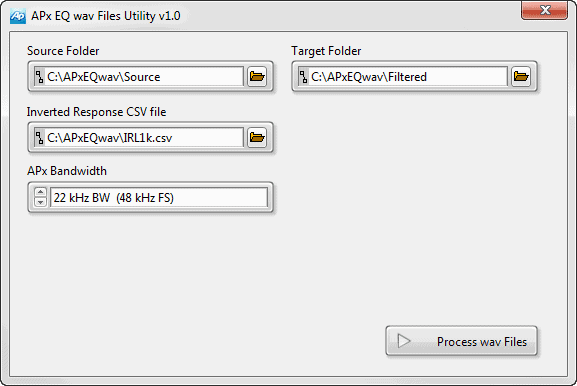
Fig 12 APx EQ .wav Files Utility
The command-line (CLI) version can be run automatically within an APx project from a Run External Program step. A sample APx project file is included with the utility to guide you through the steps of creating an EQ file for a loudspeaker and then testing a device with correction applied. The project uses the CLI version and makes use of APx500’s automated data import/export capabilities as well as its Invert Derived Result to create the inverse EQ curve.