

10 Ways to Reduce Testing Time in APx500
Looking to accelerate your audio tests? In this article, we’ll show you how you can accelerate your audio measurements with APx500 software.
1: Use a Fast Computer
2: Use a Fast Measurement Technique
3: “Fix” the Analyzer Input Ranges
4: Uncheck Signal Path Setup
5: Delete Unused Results
6: Hide the Filmstrip
7: Hide the Notes Panel
8: Hide the Entire Application
9: Turn Off the Signal Monitors
10: Save data to CSV files
11. Bonus tip at the end!
1: Use a Fast Computer
APx500 analyzers do most of their signal processing on the host computer, and a more powerful computer will make these measurements faster than a slower computer. Therefore, the easiest way to speed up your audio measurements is to use simply a more capable computer. Specifically:
- Use the fastest CPU you can get; APx500 performs best on Intel CPU’s.
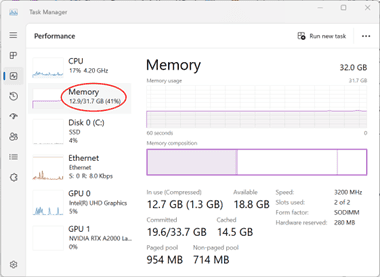
- Get more memory; 16GB is a good start but you can use the Windows Task Manager and observe how much memory is utilized. Try to avoid 100% utilization while running APx500.
- Use a solid-state drive disk drive, especially on-motherboard. NVME devices provide much improved performance compared to traditional spinning disk mass storage drives.
- Saving data to local storage will always be faster than saving data to a network drive. If you are saving data to a network drive, use a wired network connection, not a wireless network interface.
2: Use a Fast Measurement Technique
If you are using traditional stepped frequency sweeps and other single-point measurement techniques, consider the following comparison of different measurement techniques:
| 20 Hz – 20 kHz Typical Test Time | Frequency Response | THD | THD+N | TD | TD+N | |
| Stepped Frequency Sweep | ~20 seconds | ✓ | ✓ | ✓ | N/A | N/A |
| Log Chirp | <1 second | ✓ | ✓ | N/A | N/A | N/A |
| Fast Sweep | ~8 seconds | ✓ | ✓ | ✓ | N/A | N/A |
| Multitone | ~3 seconds | ✓ | N/A | N/A | ✓ | ✓ |
Log Chirps
A Log Chirp is a sinusoidal waveform that varies in frequency continuously with time.
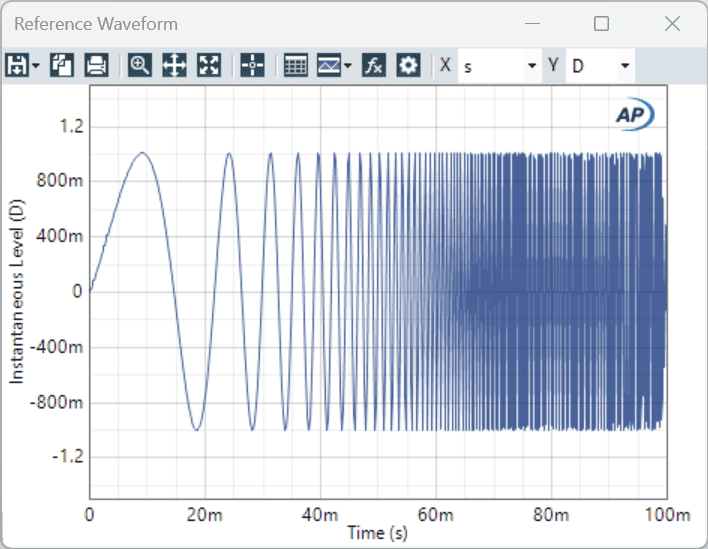
The advantage of the chirp measurement technique is that by using a sinusoidal waveform, the response of the device under test is the same as the response when using a traditional stepped sine sweep. In addition, the advanced signal processing used with the chirp waveform makes it possible to derive the Frequency Response, Phase, THD, and many other parameters of a device in as little as 100ms. The main disadvantage of chirp is that it cannot measure noise or THD+N.
Chirp is available in the following APx500 measurement functions:
- Frequency Response
- Continuous Sweep
- Acoustic Response
- Loudspeaker Production Test
- Impedance/Thiele-Small
- Bench Mode
Fast Sweeps
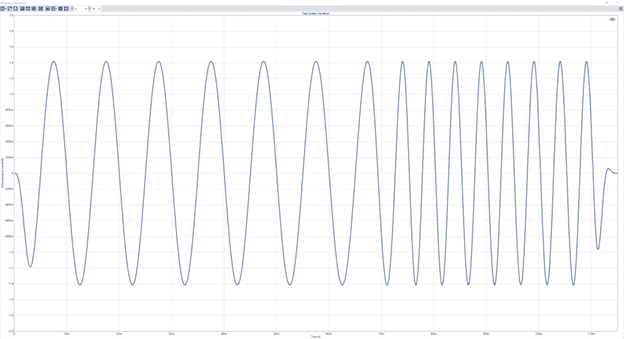
A Fast Sweep is a stepped sine sweep in which every trick is used to optimize the test time. This includes using continuous phase transitions between steps:
The Fast Sweep also optimizes the signal processing so that only the minimum amount of time is required for each measurement point. This allows Fast Sweeps to be twice to three times faster than traditional stepped frequency sweeps.
Fast Sweeps cannot be as fast a chirp, but they do have the ability to measure THD+N and are much faster than traditional stepped frequency sweeps.
Fast Sweep is available in:
- Continuous Sweep
- Acoustic Response
- Loudspeaker Production Test
- Impedance/Thiele-Small
- Bench Mode
Multitone
Instead of sweeping a single tone at each frequency point of interest, what if we stimulated the device under test with all the signals simultaneously? That is a Multitone.
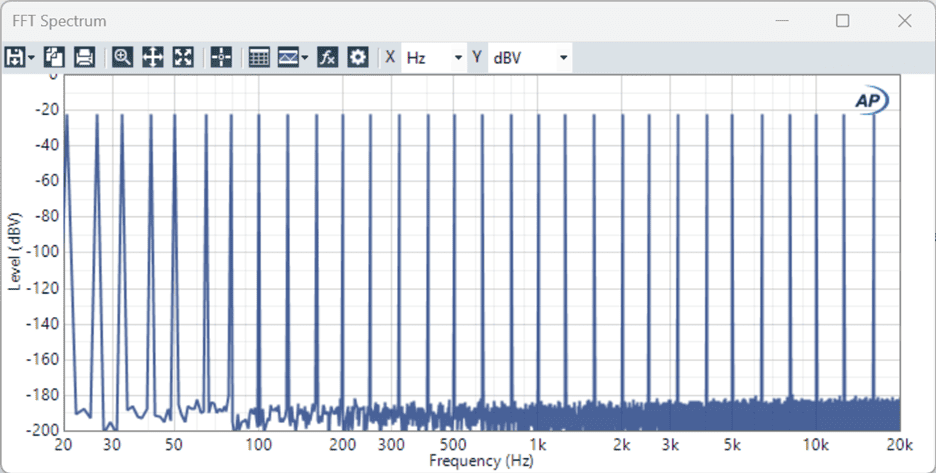
By stimulating a device with all the frequency points of interest simultaneously, the response of the device can be derived much faster than a point-by-point sweep. In addition, Multitone can derive the frequency response, distortion, and noise of the device under test. However, because the device is being stimulated by a complex signal, the results are not the same as the single tone total harmonic distortion (THD) and total harmonic distortion and noise (THD+N) you may be familiar with. Instead Multitone provides total distortion (TD), and total distortion + noise (TD+N) where the primary difference is that TD and TD+N include the harmonic distortion and intermodulation distortion of all the component tones simultaneously.
Multitone is available in the Sequence Mode Multitone Analyzer.
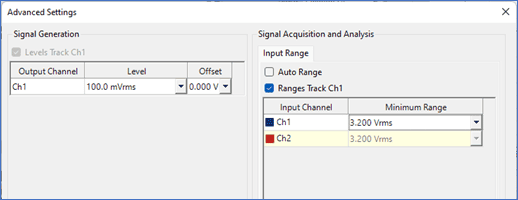
3: “Fix” the Analyzer Input Ranges
APx analyzers incorporate auto ranging circuits that measure the voltage on each input channel and automatically select the correct range for the received signal.
If a range change occurs during a measurement this will cause it to restart or even fail, at least doubling the runtime. To prevent these slowdowns from occurring, use the following steps to fix the analyzer input ranges high enough to accommodate the expected voltages.
- To access Input Range settings:
- Sequence Mode: Select the measurement of interest, then click the Advanced Settings button at the bottom of the measurement configuration pane.
- Bench Mode: Click the “Input Range…” button in the Signal Path Setup pane.
- Uncheck the Auto Range box.
- Enter the maximum expected input voltage into the Minimum Range field. Set individually per input channel if desired.
- If using Sequence Mode, repeat the steps above for each measurement you would like to have a fixed range.
For more information on input ranging see Analog Input Ranges in APx500 Audio Analyzers.
And if you are worried about overloading the input, the analyzer will still increase the input range automatically if it is subjected to a voltage above the currently selected range.
4: Uncheck Signal Path Setup
Unless you would like to return one of the Signal Path Setup results or are performing another automated action only available in Signal Path Setup (such as Auto Gen Level regulation), leave Signal Path Setup unchecked.
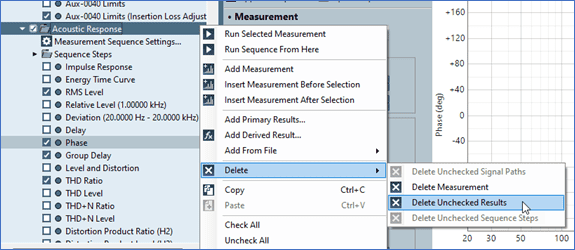
5: Delete Unused Results
Eliminate all measurement results that you don’t need. This can be accomplished quickly by first checking the results you want to include in the sequence, then right-clicking the measurement node (for example, “Acoustic Response”) and selecting Delete->Delete Unchecked Results.
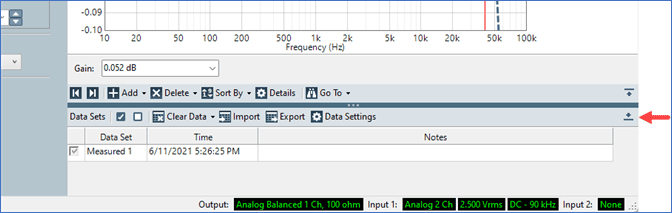
6: Hide the Filmstrip
In APx500, the filmstrip is the horizontal strip of graph thumbnails that is displayed directly below the active graph. This panel collapses using the button indicated in the image below.
7: Hide the Notes Panel
Collapsing the data set Notes panel may also speed things up a bit, though the effect is more marginal.
8: Hide the Entire Application
Sequence Mode supports a simplified view called Production Test Mode. When locking a project into Production Test Mode, uncheck the “Show APx Application Window” option to hide the main application from view.
If using the APx500 API, hide the app by setting the Visible property of the APx500 instance to False.
9: Turn Off the Signal Monitors
If there is no need to visually monitor the input signals, turn off the input Monitors and Meters.
10: Save data to CSV files
If you are saving data from the APx software automatically, saving data to a comma separated value (CSV) is much faster than saving it to a Microsoft Excel, .XLSX, formatted file.
11. Bonus! Use the latest version of APx500 software, v8
We are always improving our software, and particularly with version 8 we made noticeable improvements to the speed of the software, particularly the time to switch from one measurement to another. Always check for the latest software to ensure that you have access to the best and fastest measurements.
Conclusion
You might be surprised by just how fast audio measurements can be. Such was the case for a customer who recently contacted us out of frustration that it was taking 2 minutes to measure their device. After careful optimization, we were able to reduce this testing to just 12 seconds. If you would like assistance for implementing these strategies, contact the AP Global Support department at [email protected].
An APx515 customer asked, what’s the right way to load the analog generator output of the APx515? Especially: What is the lowest resistive load allowable for the generator output? What is the output impedance of the generator output?
Read more
APx500 Flex is Audio Precision’s most affordable audio measurement solution, now offering up to 16 simultaneous ASIO channels at no extra cost.
Read more
The APx500 software is a powerful tool that offers users the flexibility and control needed to automate, integrate, and customize their audio testing processes in a wide array of scenarios. By understanding the capabilities of the APx500 software and its API, you can leverage them to streamline your workflows, enhance productivity, and create custom solutions tailored to your specific requirements.
Read more
Measurements specifically aimed at regulation in Sequence Mode and Bench Mode as part of the Signal Generator Regulation on APx500 2 part post
Read more